FINAL EXAM WILL BE HELD ON 29 APRILL 2011.
GOOD LUCK!!!!!
GOOD LUCK!!!!!
INTRODUCTION
•Resolution is the measurement of how many dots/pixels fit into one inch.dots/pixels fit into one inch.
•The higher resolution, the sharper the image will be.
•Recommends resolution: 300 dpi (dots per inch) for crisp, clear results.for crisp, clear results.
•Lower resolution images appear fuzzy, jagged and blurry.
Resolution = 300 will print
Resolution = 72 dpi will not print well
•Resolution and image size are inversely proportional to each other.
•Enlarge an image, the resolution an image, the resolution decreases; reduce an image,resolution increases.
THINGS TO AVOID
•This resolution is good for quick transmission over the internet, but is not acceptable for useover the internet, but is not acceptable for use in printing.
•Do not save images or graphics from a website to use in your print project
•The maximum print size that a digital camera can produce is directly related to the number of pixels on the camera's CCD (the resol ion)piels on the camera's CCD (the resolion)
SCALING.
•Scaling is an extremely important working tool for printing.
•There are two ways to scale an image, either during the scan, or after the scan.
Scaling to print a different size
Resolution dpi = (pixels of length) / (inches of length).
• Suppose our image is 1200 pixels wide.Contemplating printing it, we see that we could
print this image at several different sizes, simplyby changing the scaled resolution.
Example….
• 1200 pixels / 10 inches = 120 dpi
• 1200 pixels / 8 inches = 150 dpi
• 1200 pixels / 4 inches = 300 dpi
• 1200 pixels / 3 inches = 400 dpi
• 1200 pixels / 2 inches = 600 dpi
Resolution dpi = (pixels of length) / (inches of length)
Pixels ÷ DPI = Inches
PRINT VS ONLINE
• Resolution must be high
• 300 DPI for micrographs, and similar photographic-type images.
• 600 DPI for images like graphs and drawings.
• Color - Printing is done in CMYK.
• Colors outside CMYK’s gamut will not be printed.
• Remember, CMYK’s gamut is smaller than RGB’s.
• This can lead to loss of image detail when Viewing the printed image if the source was in RGB.
• Monitors display at 72 - 96 DPI, so 100-200 DPI is plenty for any kind of figure
• More than 200 DPI is overkill
• the files become very large.
• They may not display properly on a monitor.
• Color – Monitors display in RGB
• RGB contains almost all of CMYK’s colors.
• Most images, whether in RGB or CMYK format,will display color properly in online media.
Intro to digital images
Steps of Digital Photography
• Step 1. Capturing Photographs (from Digital, film, slides, negative,etc)
• Step 2. Editing Photographs (using photo-editing program such as Photoshop)
• Step 3. Sharing Photographs (Print, e-mail, web, DVD,etc)
GRAPHIC QUALITY
• Two factors that determine image quality are resolution and color depth.
– Resolution is the number of pixels per inch.
– Color depth refers to the number of distinct colors an image can contain.
- Image quality also dependent upon the equipment on which they are produced (scanner, camera) or displayed (monitor, graphics card)
RESOLUTION
• affects the amount of discernible fine detail in an image.
• Computer images are made of dots.
• The more dots per inch (dpi), the higher the resolution.
Used when printing - pixels are turned into dots per inch and counted by the spread over the paper. Printers range from 300 dpi to 2400 dpi(or more).
• On the computer screen, the dots are called pixels.
• Monitor resolution is usually around 72 –96 dpi.
The color depth determined “How much data in bits used to determined the number of colours in an image file”. Colour depth is measured in bits per Pixel
Colour Depth
– 1 bit
– 8 bit
– 16 bit
– 24 bit
– 32 bit
The greater the color depth, the more colors may be stored.
For example:
– 1 bit 2 colors
– 8 bit 256 colors
– 16 bit 65,536 colors
– 24 bit 16.7 million colors
– 32 bit Millions plus extra information
The greater the color depth, the more colors may be stored.
For example:
– 1 bit 21 2 colors
– 8 bit 28 256 colors
– 16 bit 216 65,536 colors
– 24 bit 224 16.7 million colors
– 32 bit 232 Millions plus extra information
• The more colors per pixel, the larger the file size.The higher the image resolution the greater the file size. The higher color depth, the greater the file size.
File size vs Resolution vs Colour depth ?
• The more colors used, the more bytes are required to encode the image, and the more bytes required for an image, the larger the file to store the image.
• The higher the image resolution the greater the file size.
GRAPHIC FILE FORMATS
• Some of the most common are:
– GIF (Graphics Interchange Format)
– JPEG (Joint Photographic Experts Group)
– TIFF (Tagged Information File Format)
– PIC (PICTure)
– BMP (bitmap)
– TGA (Targa)
– PNG (Portable Network Graphics)
Which file format should be used:
• Small images like icons and buttons: GIF or PNG
• Line art, grayscale (black and white), cartoons: GIF or PNG
• 24-bit color-depth lossless Image: PNG, JPG
• Scanned images and photographs: JPG
• Large images or images with a lot of detail: JPG
• Animated icons : GIF
• High Quality printing: TIFF
TIFF or TIF
• Good for master copies of images.
• Uses lossless compression which means when a TIFF file is saved, no image
information is thrown out.
• This also means the files can be large. JPEG or JPG
• JPG is the most common format for viewing images on the Web.
• JPEG images are small for fast delivery over the Web and are also the most
common format saved in digital cameras. JPEG or JPG
• JPEG uses lossy compression
• Don't save JPG's over and over because the images get compressed over each
other and lose significant amounts of image detail and information.
• High quality JPEG is often 1/10 the size of a TIFF.
1. FIND YOUR ACTIONS PALETTE


Click Windows > Actions
*You also can download variety actions from the internet.
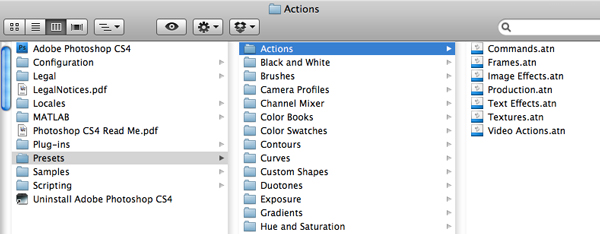
There are multiple ways to install Photoshop actions. For starters, you can drag the downloaded actions into the “Actions” folder contained within the “Presets” folder in your Photoshop application folder. Note that actions placed here may require a Photoshop restart to appear in the actions menu.
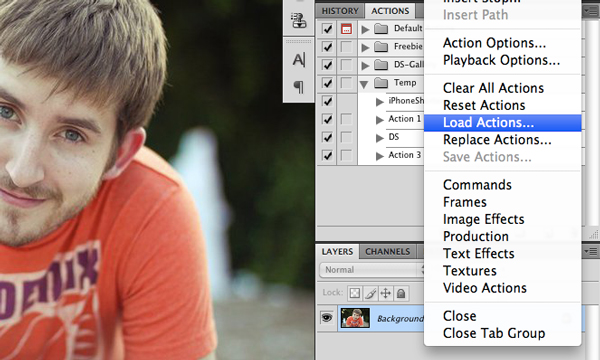
Alternatively, you can hit the little arrow on the right of the actions menu and click on the “Load Actions” option. This allows you to navigate to any actions on your computer and load them instantly into Photoshop.
Now that you can install Photoshop actions and even create your own, download a few of the free options below and start making your images look amazing with a single click!
2. CREATE A NEW ACTION

3. BEGIN RECORDING THE ACTION

Click record button.
4. DO YOUR STUFF
Now do whatever it is that you wanted to do. Perform all the tasks, clicks, option settings, and image adjustments that you want included in your action.
5. COMPLETE THE ACTION
So once you’re done with the sequence, its time to stop the action. Just press the “Stop” button at the bottom of the action palette and Photoshop will stop recording.
6. TEST AND REFINE
If you find a mistake with one of your steps, just select that step and “Record Again” (via the pull-down menu). Or if you want to re-order some steps, just drag them up or down the list until they land where you want them.
To solve this problem, first, you must understand the meaning of DPI, PPI and resample image.
What is DPI and PPI?
DPI (dots per inch) is a measurement of printer resolution, though it is commonly applied, somewhat inappropriately, to monitors, scanners and even digital cameras.
For printers, the DPI specification indicates the number of dots per inch that the printer is capable of achieving to form text or graphics on the printed page. The higher the DPI, the more refined the text or image will appear.
In the case of monitors, DPI refers to the number of pixels present per inch of display screen. The technically correct term is "PPI" or pixels per inch, but DPI is commonly used instead. A display setting of 1280 x 1024 has 1.3 million pixels on the screen, while a setting of 800 x 600 has 480,000, or less than half the resolution of the higher setting. With fewer pixels, the picture will not have the clarity that can be achieved with a higher saturation. Each dot or pixel reflects a certain color and brightness. The greater the number of pixels, the more detailed the picture can be.
Resizing and resampling images.
When you resize an image and resample it, you change the amount of data in that image.To resample your image, ensure Resample Image is checked at the bottom of the Image Size dialog box. Resample is on by default.
Resampling changes the total n umber of pixels in the image, which are displayed as Width and Height in pixels in the Image Size dialog box in the Pixel Dimensions section. When you increase the number of pixels in this section of the dialog box (upsampling), the application adds data to the image, and when you decrease the number of pixels (downsampling), the application removes data. Whenever data is removed from or added to the image, the image quality degrades to some extent. Removal of data from an image is usually preferable to the addition of data, because upsamping requires that Photoshop or Photoshop Elements guess which pixels to add; this is a more complex procedure than guessing which pixels to remove, when you downsample. You will get the best results working with images that you bring into Photoshop in the proper resolution for the output you want. You may get the results you need by resizing your image without resampling. However, if you need to resample your images, you'll want to do so only once.
When you check, or turn on, Resample, you can change any or all of the three values in the Image Size dialog box: pixel dimensions, physical size, or resolution. If you change one value, then you will effect the others; the pixel dimensions are always affected.
REMEMBER!
You cannot set the file size; it changes when you change the total amount of data in the image (the pixel dimensions). If you note the file size value before you change the other values in the dialog box, then you can use the file size information to understand how much data will be removed or added to your image when you resample the image. For example, if the file size changes from 250 KB to 500 KB, you'll be adding twice as much data to the image, which may seriously degrade the image. Degraded images may look blurry, or jagged or blocky.
The size of an image when you view it on the screen is different from the size of an image when you print it. If you understand these differences, then you can develop a better understanding of which settings to change when you resize an image.
The screen resolution of your monitor is the number of pixels that your monitor can display. For example, a monitor with a screen resolution of 640x480 pixels will display 640 pixels for the width and 480 pixels for the height. There are several different screen resolutions you can use, and the physical size of the monitor screen usually determines the resolutions available. For example, large monitors typically display higher resolutions than small monitors because they have more pixels.
To find out what your screen resolution is, choose Start > Control Panel > Display > Settings and look at the screen resolution (Windows) or System Preferences > Displays and look in the resolution section (Mac OS).
Images are of a fixed pixel size when they appear on your monitor. Your screen resolution determines how large the image appears to be. A monitor set to 640x480 pixels displays fewer pixels than a monitor displaying 1024x768 pixels, so each of the pixels on the 640x480 pixel monitor will be larger than each of the pixels displayed on the 1024x768 pixel monitor.
An image of 100x100 pixels will take up approximately 1/6 of the screen at 640x480, but it will only take up approximately 1/10 of the screen at 1024x768, so the image will look smaller at 1024x768 pixels than at 640x480 pixels.
The other values used in resizing images, the physical size of the image when printed, and the resolution (the number of pixels per inch), aren't used in calculations until the image is printed. When you go to print, the physical size of the image, the resolution, and the pixel dimensions interact to determine the amount of data in the image and its print quality. In general, higher resolution images print at a higher quality.
Conclusion :
First, The print shop must know about dpi and ppi because DPI is nothing to do with digital image resolution or quality. If the print shop said they cannot print the image because of dpi, we can explain to them what is the differences between dpi and dpi. Remember, to get the better image quality , do not resample the image, just increase theDPI.
Another thing, there are four main factors that determine image quality:
1) The quality of the recording device (camera's optics and sensor, scanner's sensor).
2) The size (in pixels) of the digital image.
3) The digital format it is stored in (lossless vs lossy compression).
4) The technical proficiency and the "eye" of the photographer.